Leave No Child Inside

Leave No Child Inside
Just another beautiful day!
Showing posts with label The family kat. Show all posts

Tuesday, July 29, 2014

DIY: Home Made Moving Announcement and House Warming Party

We recently bought a house and are moving. This is not our address (I may address that in another blog someday) and this is not the date the house was ready either....But when it was finished and the dates and address corrected, this was by far the cutest and MOST creative home made cards I have every made. Also the most expensive, about $10 each, with postage about $12 and I made 75. I got all the supplies from Michael's, except the labels, I got those at Staples, and did all the printing at home. I got the clip art: the moving van, the "return" finger, the up arrows, the fragile symbol and other box symbols off the internet.  

So this is what I used and how you can do it yourself and make your own Moving Announcements, or House Warming Party invitations. 


In the list of supplies are inward 5X7 opening cards with envelopes in "cardboard" brown (they came 10 to a package). I also got grated or cardboard textured scrap booking paper which came in 12X12 sheets and worked out to make 5 "side pieces" each. I also used double sided tape, an exsacto knife and lots of other blades, scissors, a pointed pen, a black sharpie, scrap booking tape, a cutting board, masking tape in light tan and red, and address labels in CLEAR and white for the "packaging" look. 

I also bought and used that clear bubble wrap to make my new work contact information. I would have used it anyway, to still give it that packing material feel, but turns out I slapped a clear label on there with the information and it looked even better. 


Here you can really see why I wanted the inward opening cards. I wanted to give the cards the feel of "unpacking a box" when you were opening it. I taped with masking tape the front folds and back, to give it the taped box look! It worked!!


I made so many it was hard to stuff and stack them, so this is just a photo of how I kept them organized. Hope you like this! I loved making them and it was a lot of work, but really worth it. Enjoy!!


Tuesday, May 8, 2012

Being Adopted - Poems by Kathy Worrell

These are poems that have taken me years to write; one because I hadn't quite figured out what "being adopted" meant to me (as it is an ongoing discovery for me) and two because they were a bit difficult to write all in one sitting. In order to convey the feelings - I actually had to be feeling the feelings; confusion, wonder, curiosity, love, anger, sadness, loss, gain, pity, strength, just about every emotion comes to mind when I think about being adopted; other adoption stories and that of parents trying to adopt, or the decision some make to put their child up for adoption. And usually not all at once do you feel the same things, so it is process. I have random days where something or someone will trigger a thought process or idea that I follow up on and it will in turn make certain emotions come to the surface. And of course the birth of my own daughter brought up thoughts and I think allowed me to come full circle and finish the poems I had started. For those of you who don't know me, I was 22 months old when I was left at a day care center (that I guess takes in and places children) by my biologically mother, who had left my biological father and apparently did not tell him what she was doing. I don't know the full story other than, instead of a group home, I was placed in the loving hands of my adoptive parents, who were foster parents.

However emotional they seem, they do not reflect my typical...whats the word..."appreciation" or "gratitude" I have for the process of adoption, or the love I have for my adopted family. Who, incidentally, don't even think of me as being adopted - I hardly acknowledge it. In fact, I don't want anyone to think that I am unhappy, harvesting these emotions on a daily basis or anything, or actively seeking my biologically family because of what is said in the poems. I am actually very happy things happened the way they did, I am grateful for my family and all the love they give me all the time. As well, as I should note that on more than one occasion - I have counted my lucky stars that I was adopted so soon, and realize how close I came to different life. Either way, these are the feeling or thoughts I have had concerning MY adoption, and I am sure I am not the only one to experience them. Enjoy!
Being Adopted
Poems

By

Kathy Worrell

My First Person:

The first person to know I exist

Probably wondered if I should

Confused about who we were

Not knowing if she could


The first person to love me

Was by far, not be the last

Still she had created me

Forever, a part of my past


There from the beginning

How much of me did she know?

She must have thought it better

For me, to be raised in a different home


The first person I ever knew

But will never know again

Though she means not anything

I wonder who she would have been


The Truth About That Day:

Although I feel complete

So many things have blessed me

I think I need the whole truth

To please my curiosity


What’s a mother without her child?

And how did she come to that

She must have tried to make it work

Though scared to go on without my dad


Maybe she gave it all she had

But in the end was not enough

It’s hard to tell if she did what she did

For me or for herself


One day she left me to strangers

At a daycare near by

Ironically named a Haven

Eventually, the only child left inside


Confused at closing time

As day turned into night

Did I know what was going on?

Could I read it in their eyes?


Maybe she told me ahead of time

This would be our last drive

Waiting, waiting, waiting

So, did she say goodbye?


I now belonged to a whole state

At the tender age of two

Where would I go for the night

What to do, what to do?


Too young to help myself

Luckily the Haven knew what to do

Had they scene others like me?

Others who were abandoned too


What did she tell herself?

When night grew near

Did she wonder who would tuck me in

Or did she even care


I think a heart will tear a little

When it’s confused this way

I think we've both been broken

Especially that day


What about my favorite toys

That lay around the house

Did she hold on to something?

Or did she have to throw it all out


What did she tells others

There must be another who knew

When your child become just a memory

Does it change your heart too


I don't remember a thing

I know I'm better off that way

But I do have questions

About what happened that day


A MOTHER to the rescue:

Luckily swift and caring action

Of the system at work

Would place me in the loving hands

On the day of this woman’s birth


Always a mother at heart

Though none of her own

She'd someday be the part

Taking this baby into her home


A mother to the rescue

Love at first sight

And always meant to be

She would rescue me that night


A birthday wish come true

And a blessing from above

No matter how is happens

God blesses us with love

Saturday, February 25, 2012

HOW TO: DIY Homemade 60th Birthday Invitations for mom

Without giving to many details away (come on I run a business here!). Here are the 60th Birthday party invitations I made for my mom! I used a couple different fonts (including a 60's font), hard card stock and creative computer skills to make these, print and cut them out. After printing them I added glitter, and a matted it with a light pink paper, and ribbon.

This and a computer are the only supplies I used! I can make custom creative invitations for less than a $2 each.

Friday, February 24, 2012

HOW TO: DIY Yo Gabba Gabba Birthday decorations

This is a series of photos of items I made from paper and other craft materials for my daughters 3rd Birthday party. She loves Yo Gabba Gabba, so that was the theme! I used images I got off the Internet and I used a font similar to that of YGG called "yahoo" and believe it or not I completely designed the radio from YGG by myself as there was not an image available anywhere that I could use. So I used a series of circles, squares and the best color matches on my computer to make it and it turned out great!! Enjoy!! 


This was a pennet banner I made that said Happy Birthday. We also used similar colored paper to make a bunch of rainbow paper chains and used that to add to the decorations. I love paper chains because they are easy to make and use and make a HUGE statement and look so festive!!

Above I cut the arms off the characters so they were more mobile and also made a pennet looking banner that went over the window.


This is a centerpiece I made - i actually ended up making two because it turned out so cool. Just goes to show you what you can do with materials that are just sitting around the house. So metallic duck tape and a printer!


This was the party bags - using my favorite DIY bag pattern I plug in some YGG and voila a custom party bag!

And of course what would a party be without invitations. So I used my awesome radio and went to town to design a unique custom - open in the middle invitation that really ROCKED!! Yes, I am for hire :)

DIY: How to make Homemade Felt Food for kids and Homemade Yarn Food for kids.

DIY: This is how to make FELT Food and YARN or CROCHET foods for your kids pretend play or for a great gift. I got this idea from our Children's museum, they used scrap craft materials such as felt, yarn and ribbon - with no real shapes they just let the kids make what they want out of what pieces they find. I like the idea of having to use the imagination, and these days the plastic toy food is so realistic, it hardly leaves anything to the imagination. So I figured I would leave the "sandwich", and the "salad" in forms of vague shapes and shades resembling food, so there could be some creativity and freedom of imagination. However, I couldn't resist making the rest of the food as realistic as I could. And because I had no patterns, it worked out that while they resemble the intended food, they still leave something to the imagination :) Plus, it's handmade, using some recycled materials and makes for a precious gift that took time, effort and love to make! Enjoy!

"Making Bacon" - Crochet Bacon using brown and white yarn.

Finally looks like breakfast is ready :) - making crochet bacon, and crochet fried eggs.

The pile and box full of recycled containers I am going to use to "package" the food. Hey it's fun for kids to use real containers that they see us use. Plus, it's great to recycle and saves some money, as I did not have to buy containers.


These are cute little "milk" containers, I have recycled Dannon yogurt containers, washed them and then made cute little labels for them, great addition to my homemade breakfast.  Or as you see in the last photo with the crochet Oreo cookie - it's cute to make cookies and milk!
And of course encourage your little ones to be creative and use various shapes and sized fleece scraps to make a "salad".
ENJOY!!

Monday, January 9, 2012

Kathy's Homemade Chili

Homemade Chili with Macaroni:
2 cans of chili beans
1 can white kidney beans
1 can kidney beans
1 can garbanzo beans
1 can "ranch style" pinto beans
1 can "chili ready" diced tomatoes
1 lbs ground beef (browned)

FRESH:
1/2 cup chopped finely carrots, green onion, (option) bell pepper, (option) 1-2 jalapenos, and garlic, chili powder, and salt & pepper to taste.

Optional: add Macaroni! Add one box of dry macaroni and 1 can of chicken broth.

Combine all ingredients in bit pot, bring to a boil. Be careful not to burn and stir often. Then bring to simmer and heat on medium till macaroni is tender. Enjoy!

Sunday, January 8, 2012

DIY: Paper Decorations - Homemade Paper Banner and Homemade Gift bags

DIY: I love working with paper. It's cheap, handy and easy to make a number of different things. From invitations, to scrapbook pages, to personalized cards, and so much more. This year I have been experimenting with more and more paper, to see just how much I can make from just paper (and a computer of course). You don't have to use super-sophisticated clip are or photos to make great decorations, but having a variety of fonts, photos, and icons will come in handy. Luckily, you can surf the Internet and get just about anything. So here is a "gift bag" I made for my daughters 1st birthday, I have since gone on to make luminaries for a wedding, and holiday gift bags. Once you have the pattern down, it's so easy. So here it is again.

Cut, fold and tape! Viola!


Added side creases for effect! Looks a real bag!

This is what the bottom looks like when I tape it, I also tape the side too.

Next is a classic, but always forgotten the "paper banner". You make it say anything, out of ANY color, and use fancy fonts to make it cute! here it goes. So use a 8X10 to make two triangles, then put in the letters you need. Then print on colored paper, or on white if that is what you want. 

For the holidays I use RED and GREEN paper for this homemade Holiday Paper Chain.

Then I matted it to opposite color of paper.

I used two sided tape at the top and used a hole punch to put the string through.

And there you have it! An easy, cute, CHEAP way to decorate and add a festive feel to anything!! This I made and gave to my secret Santa this year. So easy!

Sunday, November 6, 2011

My first Custom Mascot - Tortilla Chip

Well here it is - my first Custom Mascot. A tortilla chip for a Salsa fest, here is his journey to full fledged live size chip! Here is his own face book page!

 https://www.facebook.com/#!/profile.php?id=100002541409762


This is the official APRA Arizona Salsa Festival logo. The mission - first to have a successful event so that APRA can keep on, keeping on; and second for me to produce a life size "tortilla chip" to be the mascot of the inaugural event!

So there is NO pattern for a giant chip - or pizza, sponge or cheese wedge. Trust me, I looked and scoured the Internet for ANYTHING remotely close. Nope! I was on my own. So the first thing I did was get dimensions and of course make them larger than life :)

I carefully scaled my salty friend and then went to the craft store. This is what Chip started out at...

A pile of tan felt. I started with the eyes, one so that I wouldn't get confused when cutting the larger pieces of fabric. But also, in the making of the eyes, Chip immediately had character, and it gave me the extra boost I needed to actually "see" that I could do this. Well once the piece were cut, it did not take long to sew together. I soon had a felt "shell" of a chip and next I added it's color. Without the orange, brown and added darker tan (like the logo) - it kinda looked like pizza dough or a sponge.

Next came the hardest point for me, which was making Chip structurally sound and actually "crisp looking, or remotely triangular. I first tried plastic mesh from a hobby store but the weight of the costume weighed the corners down, and once the persons head was in - it just drooped to almost their shoulders. I also didn't want to use anything to "industrial" because people would need to be comfortable in their and I didn't want the costume to weight a ton from a bunch of steel rods. I also needed it to be "squishy" like a mascot and pliable - so wooden dowels wouldn't work - they would just snap if under pressure. What to do?


I figured it out! Unfortunately, the artist added a sombrero to Chip, so keeping a hat on him, and finding a hat big enough was the next step. Then instead of slaving away over making orange tights and a shirt for the "under ware" I bought GOLD colored cotton blend Haynes. A long sleeve shirt and sweat bottoms (which have not arrived yet) off of Amazon because it is a rare color and not carried in stores.
Supplies and materials at craft store = $59.45, a hat at the costume store = $19.99, Sweats on Amazon, plus shipping = $54.97.
Total cost = $134.41
Total time = approx. 20 hours

One of my favorite pics of Chip - dancing at the Salsa Festival. He made it! From office floor to standing (dancing) at event!

How to make a tortilla chip costume
Making a life size tortilla chip
tortilla chip costume 
tortilla chip mascot
life size tortilla chip
custome mascots


Monday, July 11, 2011

A mothers night of insomnia - and a storm to boot!

I can't sleep: I'll watch a movie, I will watch HP7 part 1 on my iPod. After all part 2 is coming out and I should catch up on it. Whoa, it's 11pm, Ok, I am into this...I'll watch the rest & fall asleep. Nope. It's 1 am. I will listen to Nature Sounds...rain. Nope. There is REAL rain out side, a mansoon. And from the sounds on the monitor, it's keeping Eme awake, and our labs who are on the verge of suicide. Shaking and chattering at our door. Whinning. Now I can't stop thinking about what is blowing away & getting wet outside. Should I let the dogs in our room? No, they will just keep me awake. It's 3 am, naturally I should go outside & secure whatever it is I think is blowing away at and getting wet.


Well, now, it is only 4 am, I should use this last hour to really get some sleep. Sleep. Sleep. Sleep. Damit, are you not listening? I said SLEEP!! I mean it! Not working. Rain nature sounds be damned!! Ok, well there is only 20 mins left before the alarm goes off, the least you can do is relax...try and rest...before....zzzzzzzzz​zzzzzzzzzzzzzzzzzzzz. BEEP! BEEP! BEEP! Holy crap, what just happened?? What? Where? Who? Oh, I must have finally got to sleep - Yeah, that just happen! Monday? Really!? Hopefully tonight will go better...

Sunday, June 19, 2011

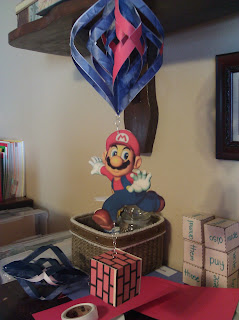
Mario Bros Birthday Decorations - homemade

Super Mario Bros Birthday!!
This is how to make a wonderful MARIO BROS birthday party, with awesome homemade decorations! Lets begin with what the finished product looks like.


All the images and art used, we got off the Internet. A little fuzzy for my taste but we were up against a time crunch and the ended up looking very 3D'ish, which worked!


In order to get these wonderful "twirly-wind-catcher-things", look up any traditional paper lantern pattern on line, to use. In this case we doubled it, then cut down the middle of the lanterns so that we could slide them together and make the latern more 3D. In some cases I used doubled sided paper, and in others I glued two colors together, to get more of put together look.  


These are the tools you will need. Double sided tape, colored paper, tape, hole punch, swivels, jewlers rings, glue dots, double sided raised dots, scissors and a computer to find and print the images you want and to look up your latern patterns.

Here is a closer look at how to connect the different ornaments.

There is a LOT of printing and cutting involved. But once the characters and the bricks and the "lanterns" are all cut out - presto, you start sticking them together with glue and glue dots (for volume) and then add the dangly-twisty things and they are ready for hanging. Enjoy!


Tuesday, February 8, 2011

Pretty Paisley Paper Lanterns - for girls bday party!

HOW TO: make a Pretty Paisley Paper Lantern
This is how to make a Pretty Paisley Lantern using pink and purple paper, on a black and white printer. I got and saved these images from clip art (key words: animal, prints, designs) and the paper is Xerox printer paper in various colors.


This is not completely finished, it needs to be stapled or taped into place, and a handle added. But image a bunch of these, different shades of pink and purple, with paisley, animal and shabby chich designs - black handles all hanging from the ceiling at different lengths. Way cool, cute and cheap! My 3 favorite c's!
Pretty Paisley Paper Lantern


Step 1) Go into WORD or a general computer document making program - insert a clip art or picture onto page. Or use the ones I have provided
Step 2) Find different patterns, prints and designs on line, in clip art, etc. Choose at least 4 different patterns to make your latterens. Get creative - patterns don't have to be from the same genre or era. Dots, strips, flowers, checkers, paisley, animal prints, etc!
Step 3) Clip, crop and drag image into middle of page and make fill the entire page - so when it prints, the pattern prints over the entire paper.
Step 4) Convert image to a "black and white" or some could use "gray scale" - OR make sure when you go to print that the printed is set on black and white. You could use color but not many colors print well on colored paper...but be creative!
Step 5) Fold paper in half long ways
Step 6) Cut 1/2 inch to 5/8 inch strips that are 4 inch long in from the fold - leaving approx 1 1/2 at the top or for the base and top of lantern
Step 7) Unfold that paper, circle the paper together, then staple or tape the edges together - (see diagram, then pictures)

Paper Lantern Diagram
This is great paisley design because it covers the whole page with out "stretching". 

You can also use animal prints - there is a significant more amount of ink being used but the effects are the same!


For me personally, I like adding a different color handle and "base". In this case black. If you take black construction paper and cut it on the short side - 1 inch strips, to make 11 strips - you make enough for five lanterns. See my other blog about decorating with paper lanterns. Enjoy!!

Saturday, January 22, 2011

How To Make A Ribbon Barrette

Here is how to make a ribbon (covered) barrette:

OK, we all know of ways to duplicate an expensive item - this happens to be one of my favorite. The "oh-so-cute" ribbon barrettes that are every boutique and art fair are irresistible. But they also cost $2 - $3 a piece (or $5 for the pair), and as expected usually after the first time a toddle wears them, you only one left. So at one of the boutiques I brought a pair home to examine them more closely; in hopes I could make "matching" pairs to go with some of the outfits I had made my daughter.

So I found a pretty easy way to make them using those silver alligator  clips (you know the old fashion barber shops clips), 1/4 and 1/2 inch ribbons and glue. I also used gorilla clips to help hold in place the ribbon as I waited for it to dry. See picture.
So I started at one end and literally glued onto the silver clip the ribbon, holding it in place with the gorilla clips. Then I did make bows on the brown clips and glued those on too. HINT: to keep the ribbon from fraying I used a lighter to lightly burn the ends of the ribbon and give them a nice rounded finish. But be careful when using an open flame and know what kind of material you are using to avoid burning your self or starting a fire, and don't leave any of the materials where a child could get a hold of them. Have fun!