Leave No Child Inside

Leave No Child Inside
Just another beautiful day!

Monday, June 20, 2011

My Review of Bulk Table Tennis Balls (Pack of 144)

Originally submitted at S&S Worldwide

Quality recreational table tennis balls inspected and tested for consistent performance. Pack of 144.


Great for teen events

By Recreation from Fountain Hills, AZ on 6/20/2011


5out of 5

Pros: Consistent

Cons: Break Easily

Describe Yourself: Casual Player

Was this a gift?: No

Great for teen event, they go through them so quickley we needed alot!

(legalese)

Sunday, June 19, 2011

HOW TO: Make a CD and duck tape purse, Recycle old CD's and DVD's

HOW TO: Make a CD and duck tape purse
Recycle old CD's and DVD's
This is how to recycle your old CD's or DVD's into a fun craft, using duck tape. Below are the supplies you will need.
A ruler, scissors, 2+ CD's, duck tape and a zipper 11' to 12' long. The duck tape can be any color you choose, I chose yellow because I happen to have a yellow zipper. Craft duck tape and zippers can be found at your local craft store or Target stores. I ordered these yellow ones on-line in bulk for a project. These make great camp or teen crafts. Just ask your co-workers, family or neighbors for their old computer CD's, music or DVD's and you will have a great supply before you know it.

Similar to the "cassette tape coin purse", you want to take the duck tape (I made a piece the length of the zipper) and tape it to the inside of the CD. In this case, I made one side of the purse the "outside" of the CD and the other side, the "inside" of a CD. I also taped the zipper flush to the CD's outer edge, but you can make it so there is a little more room inside by folding the zipper over more and taping it closer to the edge. This would allow you to actually put other CD's in this "purse" or CD holder. I also left the clear circle of the CD open for the look I was going for, but I have seen it done, where the circle and opening are covered with fabric, a sticker, duck tape or colored paper.

Once the zipper is taped to the CD (NOTE: it is easier to tape to each CD if the zipper is unzipped), I used smaller pieces of duck tape to cover the inside of the purse to give it a more finished look. I then used a small square piece to cover the are where the zipper comes together, also to give it a more finished look and make it a little more sturdy.
Now you can add a strap or handle, sticker to the outside, etc. Enjoy!

HOW TO: Make a Casset Tape coin purse with Duck Tape - Recycle crafts!


HOW TO: Make a Cassette Tape coin purse with Duck Tape
Recycle old cassette tapes!
This is what the finished product looks like. Below are the supplies you will need to make a coin purse out of an old cassette tape and duck tape.

You will need duck tape (color of your choice, available at Micheal's, Target and Jo Anne's) I used blue because there was blue on this old cassette tape I found. For mass projects or camps - ask your fellow employees, family or neighbors to bring in and recycle their old cassettes, you'll have a huge supply before you know it! I also used a blue 7 inch zipper - also available at crafts stores, although I ordered these in mass on-line for this project. Scissors, sometimes a box cutter and a ruler. Very basic. Great projects for "retro" themes, or for the teen "designers".

Basically you use a small screw driver to take the cassette tape apart, discard the reels and tape, and remove old stickers if applicable. Then you are going to tape the zipper to the inside of the cassette tape. I made the tape the lenght of the zipper and simple started where I wanted the zipper to open at and taped it along the edge of the cassette. There will be tape overlay, so make sure to make even and neat folds along the way, because the ripples and bumps that the tape make will take up room in your finished product later.

Once done with both sides (NOTE: it is easier to tape to cassette when the zipper is unzipped. I made a small square piece to go in the middle, just to give the inside a more finished look. You are then free to add stickers to the out side, make a handle, etc. Also, it should be noted that I put a small piece of the blue tape, over the tapes holes, so the the back of the tape wouldn't show through. But that is another opportunity to be creative. I have seen it done with fabric, color paper, old gift cards, etc. Enjoy!

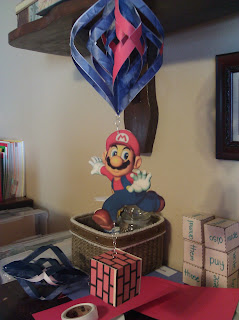
Mario Bros Birthday Decorations - homemade

Super Mario Bros Birthday!!
This is how to make a wonderful MARIO BROS birthday party, with awesome homemade decorations! Lets begin with what the finished product looks like.


All the images and art used, we got off the Internet. A little fuzzy for my taste but we were up against a time crunch and the ended up looking very 3D'ish, which worked!


In order to get these wonderful "twirly-wind-catcher-things", look up any traditional paper lantern pattern on line, to use. In this case we doubled it, then cut down the middle of the lanterns so that we could slide them together and make the latern more 3D. In some cases I used doubled sided paper, and in others I glued two colors together, to get more of put together look.  


These are the tools you will need. Double sided tape, colored paper, tape, hole punch, swivels, jewlers rings, glue dots, double sided raised dots, scissors and a computer to find and print the images you want and to look up your latern patterns.

Here is a closer look at how to connect the different ornaments.

There is a LOT of printing and cutting involved. But once the characters and the bricks and the "lanterns" are all cut out - presto, you start sticking them together with glue and glue dots (for volume) and then add the dangly-twisty things and they are ready for hanging. Enjoy!


Saturday, April 9, 2011

Spice up that old tuna sandwich

Sometimes you just need a change of pace and here is great little recipe I use to spice up my old tuna sandwich. Even though just a can of tuna and a some mayo is so easy, I think you will find this is easy too.

1 can tuna
1 can salmon
1 green onion
2 tbls light mayo
1 tble mustard
1 pinch dill weed
1 pinch Old Bay (fish seasoning)
1/4 sliced pickle + some pickle juice
salt and pepper to taste

Combine all ingredients and enjoy!! I find it better after the mixture has had time to chill and then serve on some wheat bread with lettuce!

Wednesday, March 9, 2011

HOW TO decorate with paper lanterns - old tricks awesome chich look!


Remember kindergarteni? The good old paper craft making day?? The exploration into the infinite designs of 8 1/2 X 11 piece of paper!! Well here it is again. A great idea, never goes bad! Why re-create the wheel? I took only two patterns; one for traditional slated lantern and one for a round (kinda looked like honeycomb) lantern. P.S. for other GREAT ideas, I enjoied Martha Stewart's web page and her section on paper crafts included some cute hanging paper designs! Great minds think alike! Enjoy!!


Tuesday, February 8, 2011

Pretty Paisley Paper Lanterns - for girls bday party!

HOW TO: make a Pretty Paisley Paper Lantern
This is how to make a Pretty Paisley Lantern using pink and purple paper, on a black and white printer. I got and saved these images from clip art (key words: animal, prints, designs) and the paper is Xerox printer paper in various colors.


This is not completely finished, it needs to be stapled or taped into place, and a handle added. But image a bunch of these, different shades of pink and purple, with paisley, animal and shabby chich designs - black handles all hanging from the ceiling at different lengths. Way cool, cute and cheap! My 3 favorite c's!
Pretty Paisley Paper Lantern


Step 1) Go into WORD or a general computer document making program - insert a clip art or picture onto page. Or use the ones I have provided
Step 2) Find different patterns, prints and designs on line, in clip art, etc. Choose at least 4 different patterns to make your latterens. Get creative - patterns don't have to be from the same genre or era. Dots, strips, flowers, checkers, paisley, animal prints, etc!
Step 3) Clip, crop and drag image into middle of page and make fill the entire page - so when it prints, the pattern prints over the entire paper.
Step 4) Convert image to a "black and white" or some could use "gray scale" - OR make sure when you go to print that the printed is set on black and white. You could use color but not many colors print well on colored paper...but be creative!
Step 5) Fold paper in half long ways
Step 6) Cut 1/2 inch to 5/8 inch strips that are 4 inch long in from the fold - leaving approx 1 1/2 at the top or for the base and top of lantern
Step 7) Unfold that paper, circle the paper together, then staple or tape the edges together - (see diagram, then pictures)

Paper Lantern Diagram
This is great paisley design because it covers the whole page with out "stretching". 

You can also use animal prints - there is a significant more amount of ink being used but the effects are the same!


For me personally, I like adding a different color handle and "base". In this case black. If you take black construction paper and cut it on the short side - 1 inch strips, to make 11 strips - you make enough for five lanterns. See my other blog about decorating with paper lanterns. Enjoy!!